ILS-575 Instructional design
©2004-2007 Amy Ranger
Documentation: design instruction
Main index

This project, designed to assist college students with the use of a microfilm reader, was prepared by Amy Proni (now Amy Ranger) for the course ILS-575, Instructional design, taught by Dr. H. J. Kim, Southern Connecticut State University, Spring, 2004.


How to use a microfilm reader

Introduction
Instructions
Equipment specifications
Nomenclature
Objectives
Load film/fiche
Locate article
Focus
Print
Unload film/fiche
Notable microforms
End notes


Amy icon Kalamazoo College Library
Microform User Guide


Introduction

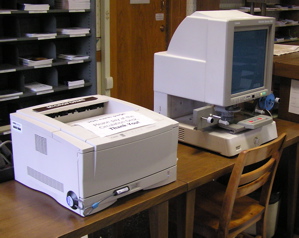
Hello! My name is Amy, and I am here to help you learn to use the microform reader and printer in the Kalamazoo College Library. My objective is that after using these instructional materials, you, the researcher, will be able to confidently use microforms, either films or fiche, with the Canon MS400 microfilm reader and printer in our library.

First let me tell you a few things about microforms. As a matter of fact, microforms include both film and fiche. Microfilm comes in roll form. It was developed more than 100 years ago as a part of conventional photographic technology. Microfilm is available in 16 or 35 millimeter widths, with 35 millimeters the standard for preservation films. Microfiche usually replicates multiple individual pages in single 4 by 6 inch sheets of film, called fiche. It is sometimes made of strips of film cut from rolls and placed in individual jackets, or by using a "step and repeat" camera, in which images are imposed directly onto a single sheet of film. A microform made with a quality polyester film base, which has been exposed and processed to international standards, and stored in a stable protective enclosure under appropriate conditions, will last for a minimum of 500 years. The issue of longevity is the primary difference between microforms and other reformatting technologies such as digital imaging.

This is why microforms are so important: when every other type of research material is discarded or fails, the reliable microform will still provide you, the researcher, with relevant information. Don’t miss out on information that may be very important to your research project – use all of the tools available to you, including microforms!


Instructions for using these materials

Please read the materials thoroughly. If you have any questions about the material, or don’t understand something, please ask for assistance.

It will be useful for you to have a roll of microfilm and/or a sheet of microfiche to practice with as you go through the materials. Again, if something is not clear, please let me know so that I can assist you.

A short pretest appears below; it is designed to help me understand how much you know about the topic. I would like to observe you work with the microform reader and printer after you use these instructional materials. I will observe and record your actions using a checklist. This will help me determine if the materials were useful to you. I have created a laminated bookmark for you to keep to remind you of the key points regarding microforms. You will find it here. Thank you very much for your participation!


Please tell me if you have any experience with microforms.

Have you ever used a microform reader before?
(If yes, please advance to Page 39, which covers the details of the Canon MS-400 model)
Yes
No
Have you ever handled microfilm but not microfiche?
(If yes, please advance to Page 46: Microfiche)
Yes
No
Have you ever handled microfiche but not microfilm?
(If yes, please advance to Page 40: Microfilm)
Yes
No


Microform reader and printer specifications

Canon Microfilm Scanner 400
Reads fiche or film
Positive or negative emulsions
90˚ image rotation
400x400 dpi resolution
Scanning speed 8 sec./frame
Options to mask, trim and zoom
Canon Fileprint 400
Multiprint up to 99 prints
High-quality laser output
Copies 10¢ each


microform reader/printer print control


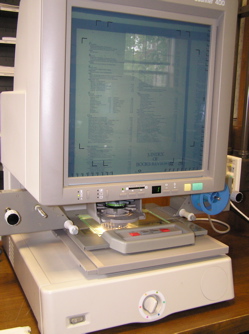
Nomenclature and location of unit controls.

Use the tall alignment marks at each corner of the screen when printing
Display screen, similar to a computer or TV monitor.


Print buttom (green), at lower right corner of display screen.


Handle for microform carrier also includes film advance buttons (double arrows indicate faster take-up and rewind).
[<<] [<] [>] [>>]


Power toggle switch located at lower left corner of base.
Microfilm reader

return to top


Objectives:
Objectives are the same for both microfilm and microfiche: that a researcher will be able to access archival research materials by loading either film or fiche in the college library’s microform reader, finding the desired article in a single attempt, focusing the lens, printing the article, and removing the microform without leaving fingerprints on the substrate.


film load

(Pictured above: film carrier has been
pulled out and glass is raised.)


Step 1: Load film or fiche into carrier 

¤ Use built-in handle to pull film carrier out.
¤ Pull until the top glass plate is fully raised.

¤ Remove microfilm from box.
¤ Remove rubber band or string wrapped around reel. (For film, continue from here with step 1.)

OR

¤ Remove microfiche from envelope touching only the white top edge.
¤ Position microfiche face down between glass plates. (For fiche, go to step 2.)

¤ Position roll of microfilm onto spindle.

¤ Press firmly until you feel it lock into place.

¤ Film feeds from the top.

¤ Thread film leader under the white roller & between the glass plates.

spindle
take-up reel


¤ Insert leading edge into slot on take-up reel


¤ Use knob next to take-up reel to advance film incrementally (see photo, below left).


¤ Push film carrier into position under magnifying lens (see photo, below right).
take-up reel cu


film carrier, closed


return to top

Step 2: Locate article

¤ For film: use the film advance buttons on the handle to advance fast [>] or faster [>>]

(NOTE: you must pull the carrier back and raise the glass when using the high-speed advance option to avoid damaging the film.)

pull

handle
¤ For film or fiche, use the built-in handle on the film carrier to move the microform on a bi-directional axis (either side-to-side or back-and-forth).
film advance buttons

return to top

focus
Step 3: Image manipulation

The same directions apply for film or fiche.

¤ Rotate image with large gray dial at top – also use this to align image between brackets on display screen.

¤ Zoom in or out with blue sprocket dial at center.

¤ Focus image with gray sprocket dial at bottom.


Step 4: Print image

The same directions apply for film or fiche.

¤ Press Print Start button (it's the green button on the toolbar at the lower right corner of the  screen).

¤ Use Clear/Stop button to cancel printing or change print quantity (it's the yellow button at the left of the green Print Start button on the toolbar at the lower right corner of the  screen).

print button/tu reel
print adjustment buttons
¤ Use the – and + buttons (pictured at left) to adjust the print quantity.

NOTE: Default print quantity is 1.


¤ Use the arrow buttons to adjust the print contrast (darker or lighter)

return to top

Step 5: Unload microfilm or microfiche

¤ Use built-in handle to pull film carrier out.

¤ Pull until the top glass plate is fully raised.

¤ Use film advance buttons on handle to rewind faster [<<] or fast [<].
(Note: you must raise the glass to avoid damaging the microfilm!).

Remove microfilm from spindle; conversely, remove microfiche from glass plate by handling only the white strip at the edge of the sheet closest to you.

Secure film with rubber band or string and replace in container; or replace fiche in envelope.


Notable microforms in the Kalamazoo College Library collection

Secretary of State's memoranda of conversation, November 1952-December 1954 [call number E 183.9 .M4 1992]
 
Current economic developments, 1945-1954  [
call number E 183.9 .C8]

New perspectives quarterly : NPQ v. 5-8 1988-1991

Chemische Berichte v. 80-94
1947-1961

Pepys' memoirs of the Royal Navy, 1679-1688 (facsimile reproduction) [
call number DA 86 .P45]

Anking newsletter (Anking, China, American Episcopal Diocese Mission) 1937-1948

return to top

End notes

Several websites provided inspiration and clarification, among them:

Illinois Institute of Technology, Paul V. Galvin Library, Government Publications Access 

Missouri Western State College, Missouri Western Library 

Gustavus Adolphus College, Folke Bernadotte Memorial Library 

University of Oregon, Knight Library, Document Center 

I am grateful to Stacy Nowicki, Ph.D., Reference Librarian at Kalamazoo College, for her assistance and insight on this and other projects.

The images used in this presentation were taken by Amy Proni with an Olympus Camedia C-750 Ultrazoom Digital Camera, then processed using the Apple iPhoto software on a PowerBook G4 computer. All rights reserved.

return to top


Last updated 2007-06-10. ALR. Contact me.